Saturday, January 28, 2012

Cake Platters

These little platters are fun to put together.  All of the food is made out of polymer clay and the little pieces of wood are very inexpensive. Some of these little cakes take me over an hour to make. I find the frosting turns out best when you apply a few layers, baking between each application. This takes a little time.  After 1-2 hours of work I usually drop the "cake" into a Tupperware and throw it in the closet never to be seen again.

I have seen dollhouse scale plates on etsy but I have not brought myself to buy any. I am so determined to make everything from scratch, but I have no idea how to make plates or a cake stand. I would really love to make a DIY cake stand! Anyway, I have found a temporary fix to my problem. I bought some very inexpensive wood pieces from a craft store. It was about $1 for 4, 3cm pieces of wood. Ok actually

1) this is a rip off but at least I didn't have to cut the pieces myself.  
2) For you Americans inches are a big mystery, I think 3cm is a tiny bit larger then an inch.

I stained a few of the wood pieces and left the others.. raw? (clearly not a carpenter). Then I made the extra little touches for each cake. For the carrot cake I made some carrots and a raw egg, for the chocolate cakes I made a chocolate bar and for the citrus cakes I made some little lemons and oranges. All of these extras take mere minutes but make such great props.

Dollhouse carrot cake
Plain chocolate frosting cake
Cherry chocolate dollhouse cake
Red Velvet dollhouse cake
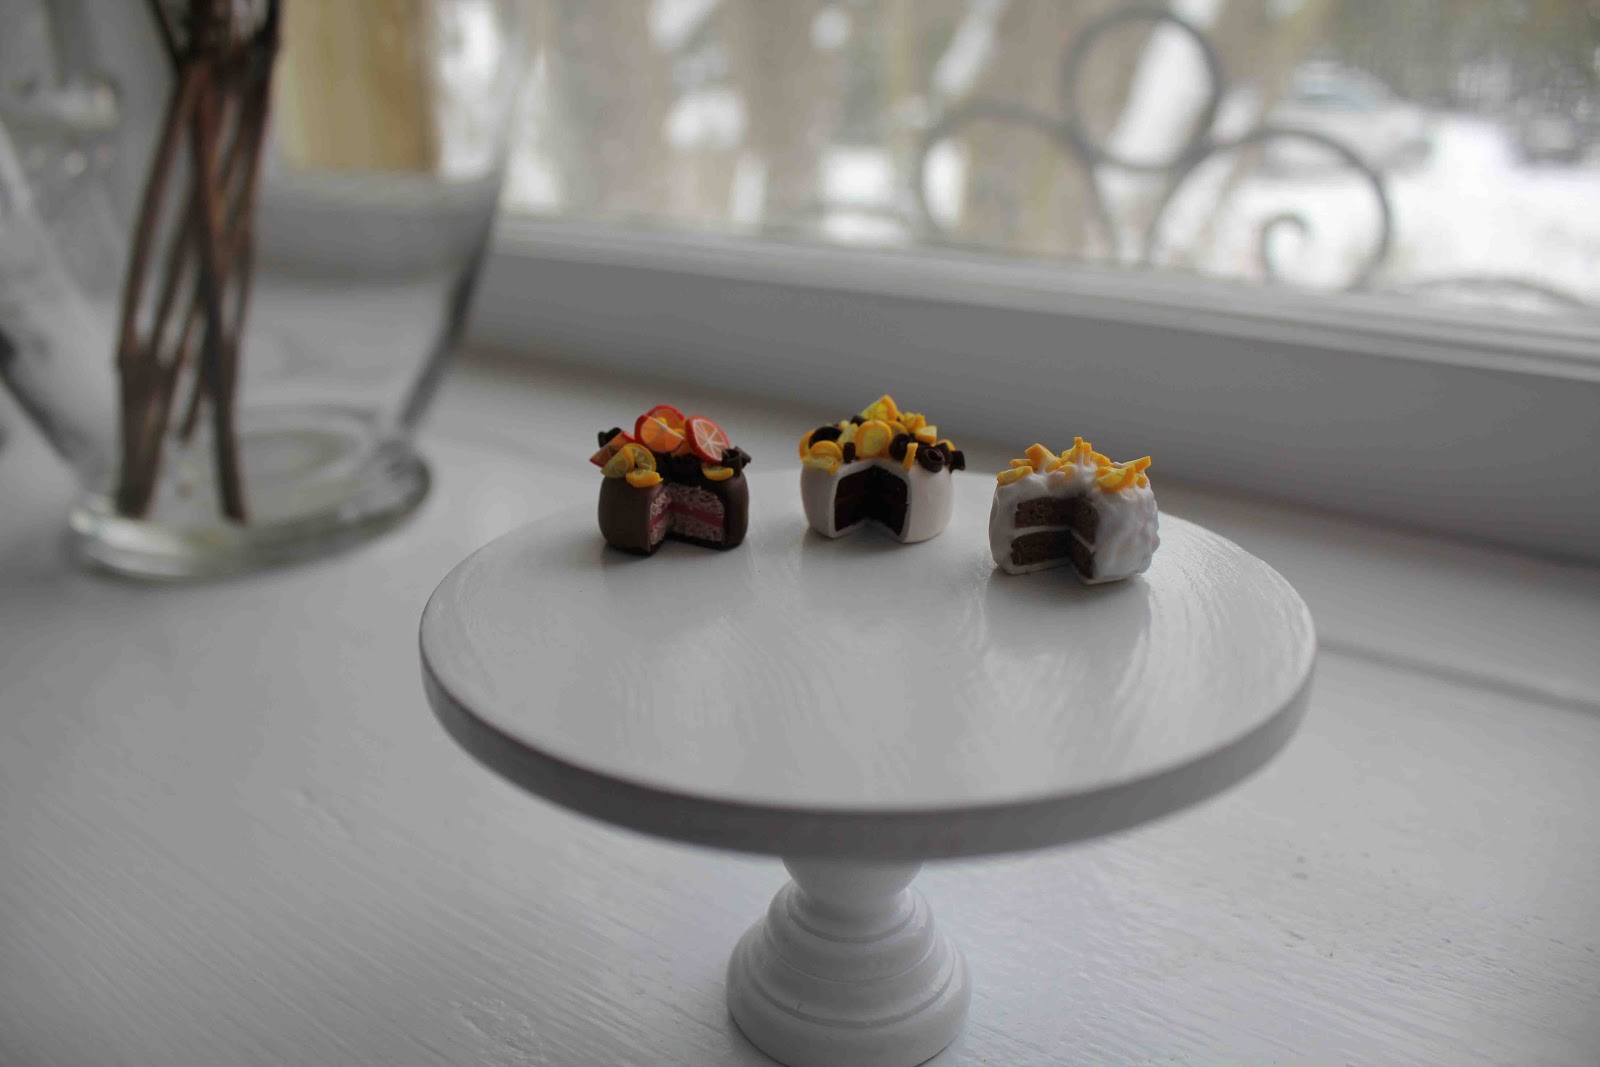
Orange citrus chocolate cake

Cherry chocolate dollhouse cake
Orange lemon chocolate dollhouse cake
Carrot dollhouse cake
Cherry chocolate dollhouse cake platter
It is the extra little touches (chocolate bars, lemons, carrots and oranges) that bring these platters to life.  Here are some tricks I have picked up for the extras.

Carrots:  I bring the carrots to life with little dirt indents. The "dirt" is just brown chalk.

Chocolate: The chocolate bars are brown clay squares that I pressed with the back of a razor and then glazed.

Oranges: the orange is a little orange circle of clay that I textured with a toothbrush.

Lemons: there are a ton of youtube videos that can show you how to make these. Just search "lemon cane".

Cake Texture:  Older clay flakes nicer then new soft clay. I use a very sharp scalpel tip to texture the cake. I found a toothpick presses down the clay and just does not do the trick.


There is one problem though, I am running out of cake ideas.  :)

Monday, January 23, 2012

DIY Dollhouse Spiral Stairs


How do you know if something is living in your plant?


Here is a quick blog (mostly for Janet because I cant send pictures to her work email) about my little hobby (pun intended).

This month I joined the MEKA (not sure what it stands for). Probably something like "Miniature Enthusiast Kingston Awesome". maybe... Anyway, this month one of the members did a tutorial on how to make a spiral staircase. I am still not done the staircase and like I have mentioned before, I have no house to put it in. The process is pretty simple. You just need some dowel and small cheap wood pieces and a friend with a drill.

Step one: (what you need)

What you need. Pieces of wood that look like this.
Step two: sand then paint or stain the wood pieces

staining my hands and my stairs
Step Three: (assemble) glue the little square piece to the bottom of the step and thread a dowel thought to connect two steps together.

assemble by over lapping one hole in the top stair with one hole in the bottom stair and connect them with the dowel. The dowel should be snug and not require any glue.

Almost done the dollhouse stairs


Another option would have been to leave 3" of dowel sticking out of the top acting as a "hand rail". I decided not to go for it, which is a serious doll safety hazard.
miter box
some touch ups
The nice thing is, I can always disassemble the stairs since I didn't have to use any glue. Except for the two support stick step. I ruined those step.

When I bought the stain ($9) I bought a $1.50 pack of 5 little wooden (~1inch x ~1inch) pieces of wood. I stained a few of them to make cute rustic cutting boards. 

I also stained some little square "cutting boards"
stained piece of wood for miniature food display


Thursday, January 5, 2012

Dollhouse Table for $1

For about $1 I made a cute dollhouse table.  I went to the craft store and bought a big bag of scrap wood parts ($5). It came with about 15 pieces of round, oval and square pieces of wood. Then I bought some wooden small candle holders ($1 for 4). OK OK.. so I bought all of this stuff for $6. So I am a big liar. BUT, I can make at least 4 tables with these supplies.

table supplies: glue, wooden small candle holder, wooden craft shapes and white latex paint.

You need (ingredients....?) : 
  • glue (wood glue if you have it, i did not want to spend the extra couple of bucks)
  • candle holder (wood) and a saw if you need to cut it to the right size.
  • round, oval or square wood pieces (dollar store or craft store)
  • white paint (I used left over latex indoor wall paint) and a brush. 

To make this little table all I did was:
  1. Using a saw, trim the candle holder to the right size (it looked a little too tall to me).
  2. Glue the candle holder to the middle of the round piece of wood and let it set over night. 
  3. Give the "table" a light sanding.
  4. Apply the first coat of paint. Let it dry, and then sand it one more time. 
  5. Apply the final coat of paint. 
Dollhouse table with winter squash and pumpkins
White round dollhouse table

dollhouse citrus cakes
 These cakes just look ridiculous. They are in desperate need of a cake stand or plate. I have a feeling that pretty soon my little apartment will turn into a rat maze of dollhouse miniatures. Pretty sure it is unavoidable at this point. I can't see myself actually buying a dollhouse. That would be expensive and not my style. My apartment is pretty small... maybe Ill just turn it into a dollhouse. Everything will be miniature. I'll invite people over and act like nothing is peculiar. "Go ahead Elo, take a seat at the table, I will get the tea"  

little cakes on a little $1 table

Two more ideas for my next little table projects:

  1. A bar style table. I will leave the candle holder the size it is, paint it a glossy black, and then make a "granite" counter top out of polymer granite colored clay.
  2. card table for poker night. Same as in this "tutorial" but I will paint the table a dark glossy brown and then attach a piece of green felt to the top. 

I think if I make the second table I will leave it out over night with little pieces of cheese on it. I think it would be just adorable to see a little mouse eating off of it. Perhaps he will bring a little spool to sit on too. That is possibly a situation that will go from cute to gross pretty fast though (ie. 1 mouse = cute, many mice = infestation). 


house mouse poker table.
Dollhouse Table
Dollhouse winter vegetables

Monday, January 2, 2012

Making a desk

I just made rice pudding and it is delicious. That's not really the point of this post, but it's true. Rice pudding is delicious and SO easy to make. And cheap. I should blog about it sometime.

Anyways, I want to make a desk. I have fallen in love with really expensive furniture since I got a job, but... turns out expensive furniture is expensive. There is an amazing desk at Bo Concept. I love the design - it's simple, but exceedingly functional. I also think that because it has a perpendicular component, it ends up making a distinct work area in a small space... such as my very tiny living room. It looks like this.


....aaaand, it costs $2,395. Which is A LOT of money. So I figured since it's only made of MDF, it's probably not worth anywhere CLOSE to what they are charging, and I decided to make it. With a lot of help from my dad. For around $87 worth of material. Thankfully we have had a very mild winter so far in Ctown, AB.

His shop is not super well set up, so it's been a bit of a challenge. The desk is almost done now, with just a few cuts to go. Basically, it's involved a lot of dado-ing. Making a dado is basically making an incision into a piece of wood (ex: the end piece of a bookshelf) that another piece of wood gets slotted into (ex: the shelf for a bookshelf). It's a type of joinery. If you have a table saw, you just get a dado attachment, set the width and depth of the dado, and run the wood through. We don't have a dado though, and my dad's 'foldable' table saw scares me anyways. So we've been making our dados using a scroll saw.

The first thing you do is manually draw in the width of the slot you want to make. Then you need to measure the width of the saw so you can set up a guide at the correct offset. Personally, I find all the measuring exceedingly boring, so I just stand around and watch. Something tells me this might not be a life-long hobby for me.

Now you've set up two guide lines at the proper offsets to cut two lines that delineate the width of your notch. Go at 'er with the scroll saw.

After you've cut two lines that delineate the width of your notch, you need to cut multiple more within the initial two cuts. It ends up looking like this:

Now, you need to get all the material out from the notch, so it's .... a nice notch. You use a chisel. I like this part. The MDF just peels up... for some weird reason, it feels nice.

And when you're done, you have a notch!!! Stay tuned - budget desk will be done soon, and OOOOs and AAAAs will follow.

LinkWithin

Related Posts Plugin for WordPress, Blogger...